

Basic Functionality
An OData service can be created in apps that have reporting enabled (e.g. Scrum). The OData service contains the definition of the object classes and properties that are exposed via the OData API.
Depending on where you create the OData service, various source objects can be used. For example, in order to gain access to your contracts, create an OData service inside your Contract Manager app.
Having created an OData service, you receive a URL which can then be used to access the data via a client like Microsoft Power BI. The OData protocol is a standardized protocol which is understood by any client - even a web browser.
Aside from the OData URL, you require the “Access for Applications” password for authentication.
Creating an OData Service
Once reporting has been enabled in the app of your choice, you need to create the OData service in the context where your data is stored so that it can be queried.
To create an OData service, proceed as follows:
- Navigate into the desired app configuration or app room, then into the “Reports and OData Services” area.
- Click the “Create OData Service” action.
- Define the following settings and click “Next”.
- Name
The name of the OData service. - Language
Multilingual strings are provided in the defined language in the data source. - Use Programming Name
If enabled, object classes and properties will not be translated and the programming names are used instead. - Cache Duration
Defines how long the data is cached. Defining longer time intervals will increase performance during subsequent calls.
- Name
- Choose the object class of which you want to add properties to the model for the OData service and click “Next”.
- Select the desired properties and click “Next”.
Note: You need to consider that adding a great number of properties will require additional resources to load. It is recommended to add the minimum required number of classes and properties. - Click “Next”.
- If needed, you can add further properties of other object classes by clicking “Add Entry”.
- Click “Next”.
- Copy the provided link to the OData service and click “Next”.
Note: You will be able to copy this link later as well by clicking on the generated OData service.
Query Types
For each entity you can select between found objects, referenced objects and user query. For “Found Objects” a query is defined where these objects are searched for. Referenced Objects are just objects referenced by another attribute.
There the following restrictions are applied: for the object classes #Object, #User and #Group only “Referenced Objects” is possible. In general, also the permission #AccTypeSearch must be given to be able to select “Found Objects”.
Found Objects
For “Found Objects” a predefined query will be executed and all the objects are searched for.
Referenced Objects
Referenced objects are objects which are referenced by another object in all the other entities. You could for example, search for (“Referenced Objects”) your documents and add there an attribute “Created by”. These users can then be found in the “User” entity.
User Query
The user query enables you to create own queries which narrows down the found objects.
Example:
SELECT * FROM COMPONENT@100.200:EntityType WHERE .FSCTEAMROOM@1.1001:objteamroom IN (COO.100.200.300.xxxx,COO.100.200.300.xxxx) AND .objexternalkey LIKE 'x1%'
This query would narrow down the objects to a Teamroom and looks through the attribute objexternalkey. The referenced objects will work the same, just with the objects which were filtered with the user query.
Examples Found Objects vs. Referenced Objects vs. Own Query
These examples should demonstrate the decision between “Found Objects” and “Referenced Objects”. In general, if you are unsure, “Found Objects” can be a good start as you will get data there. Only if you want to restrict the found objects, switch to the option “Referenced Objects”.
Example 1: Books used by Machines
Imagine there are 10 000 registered books in my organization. Some books (like manuals, about 100) are for maintaining my machines.
I want to find with OData my machines and the books used for their maintenance.
So, I define an OData Service with restriction to my whole organization with two entities:
- Machine with option “Found Objects” because I want that all my machines are found via query.
- I add there the attribute “Manual” which refers to the book used for maintenance.
- Book with option “Referenced Objects” because I only want to get books which are referenced by the “Manual” attribute from my machines.
The outcome is that the “Machine” entity contains all my machines and the “Book” contains all manuals referenced in my machines (about 100).
Example 2: Full list of Books and Machines
In comparison to the first example, I want to do statistics on my inventory. For that I need all machines and all books I have in the Fabasoft Cloud.
So, I define both entities with the option “Found Objects”. The result will be all my machines and all my books (about 10 000). Further filters I could apply with my Business Intelligence Tool like Microsoft Power BI.
Example 3: Machines which have been built before 2021
Imagine we want to monitor only machines, which have been built before 2021, “Found Objects” and “Referenced Objects” does not help us because we are always loading all machines.
For such a filtering of the input data, user queries have been introduced as described in chapter “User Query”.
SELECT * FROM COMPONENT@100.200:Machine WHERE .FSCTEAMROOM@1.1001:objteamroom IN (COO.100.200.300.xxxx,COO.100.200.300.xxxx) AND .builtatyear < 2021
User Query Together With Filter Options
If no user query is provided, a query will be created automatically. The filter options like
/Story?$filter=objchangedat gteq 2024-06-28T11:55:46
are then added automatically to the query.
But what if you provide a user query? It cannot be determined automatically, where in your user query to add the filter criteria.
Example:
You have a user query
SELECT * FROM FSCSCRUM@1.1001:Story WHERE .objname LIKE "%Storage%" AND .objname LIKE "%Service%"
If you want to request this OData-Service with a top filter or a query filter, the Fabasoft OData does not know how to modify your query to include these both criteria.
That is why you have to add the placeholders
[TOPFILTER]
and
[CHANGEDATFILTER]
If we want to enable the $top= option as well as the $filter= option, we have to add both placeholders to our defined user query:
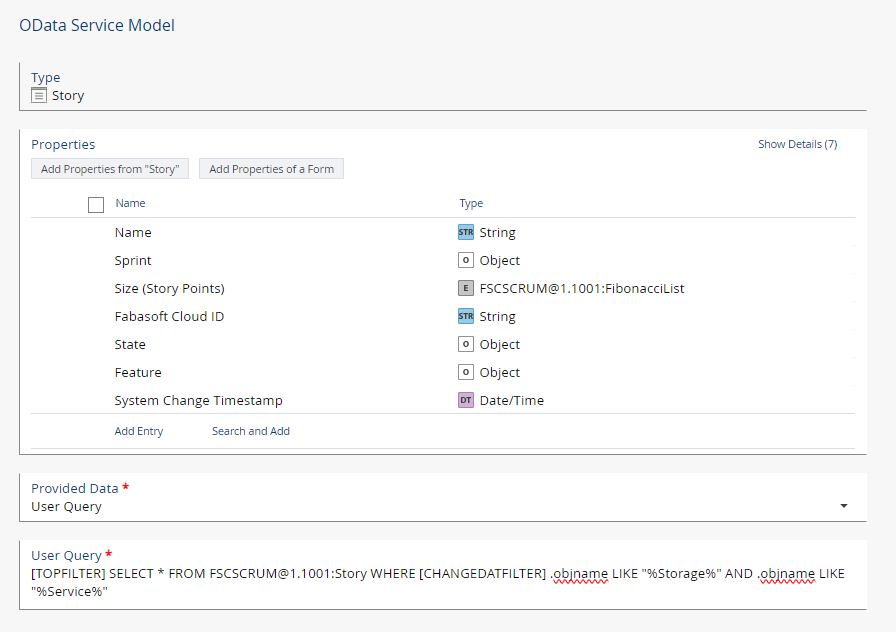
[TOPFILTER] SELECT * FROM FSCSCRUM@1.1001:Story WHERE [CHANGEDATFILTER] .objname LIKE "%Storage%" AND .objname LIKE "%Service%"
In the OData dialog it can look like that:
Filter Options
Fabasoft OData does support a subset of possible filters with the goal to optimize the performance. The supported filters are $top (see chapter ‘Performance Optimization “Getting Only X Rows”’) and $filter on the attribute objchangedat and its translated names. For the objchangedatfilter the attribute objchangedat (System_Change_Timestamp) has to be included in the attributes of an entity. Furthermore, filtering is only possible with the gteq (or ge) operator.
The syntax is:
/<entity>?$filter=<objchangedat or translated name> ge|gteq <date and time with or without timezone>
Note: objchangedat would be the right name if your OData Service has “Use Programming name”. If not, it depends on the language of the OData Service. Means for an English OData Service the filter would look like filter=System_Change_Timestamp… and in German it would look like filter=System_Änderungszeitpunkt…
An example query could look like this:
/Story?$filter=objchangedat gteq 2024-06-28T11:55:46
also possible with a time zone (be sure you encode the “+” with a “%2B”):
/Story?$filter=objchangedat gteq 2024-06-28T11:55:46%2B02:00
The $filter and $top filter can be combined by using &, for example:
/Story?$filter=objchangedat gteq 2024-05-28T11:55:46&$top=15
Other OData Parameters
OData knows a lot of other parameters. The Fabasoft OData supports only a subset of them:
- $select
Supported. You can e.g. define the attributes you want to get back like $select=name,id - $top
Supported (see chapter ‘Performance Optimization “Getting Only X Rows”’). - $filter
Supported (see chapter “Filter Options”). This is not affecting the performance as still all attributes are calculated. It only reduces the amount of data coming back. - Other parameters like $skip, $expand, $orderby and so on are not supported. They will be ignored.
Creating a Password for Applications
You need a password for applications to access your OData service. Create a password by opening the account menu (your user name) and clicking “Advanced Settings” > “Access for Applications”. Create a password valid for “Open Data Protocol (OData)”.
Licensing
OData licenses are available in 10M and 100M versions.
OData volume licenses are checked when
- the table overview for an OData service is retrieved.
- actual rows for a certain entity are retrieved.
The overview does not lower the number of available objects but the overview is not shown if there is no amount of any OData volume left.
When retrieving rows for a certain entity the OData volume is lowered by the number of rows retrieved. That means you are charged exactly by the number of rows retrieved no matter which filters are applied and how many data rows there are in original.