

Xeditor
Xeditor allows editing and creating structured content directly in the web browser.
Note: In order to use Xeditor properly, at least one XML schema configuration must have been stored.
Create Xeditor Documents
To create an Xeditor document, proceed as follows:
- Navigate to the asset shelf where you want to create the Xeditor document.
- In the content area of your clipboard, click “Add Entry”.
- Select the "New" option.
- Select "Xeditor Document" as the object class.
- Choose a "Name" and select the desired "XML Schema".
- Confirm with "Next".
Edit Xeditor Documents
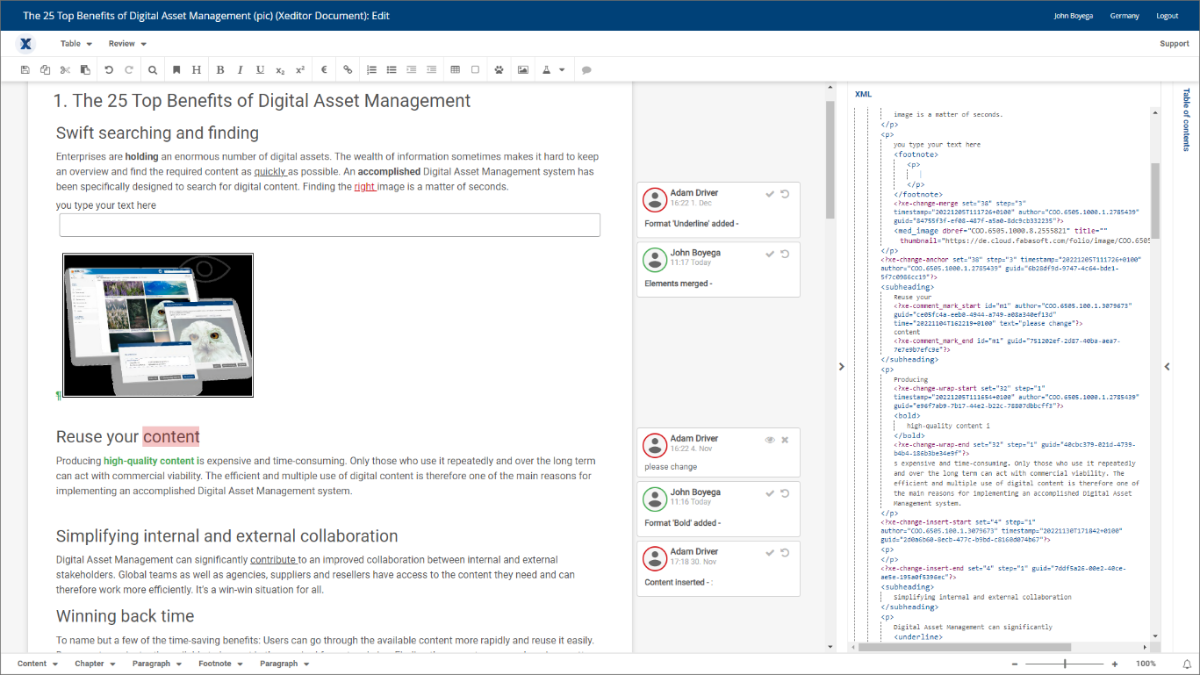
To edit an Xeditor document, select the "Edit" action in the tool area. The XML document will be opened in Xeditor as a new tab in your browser.
Workspaces
- In the main area the document is displayed according to the specified style sheet and can be edited.
- On the right, the "Table of Contents", which displays the chapters of the document as a tree, can be displayed. Alternatively, the attributes of the currently selected element can be displayed under "Attributes" and, if necessary, attributes defined in the style sheet can be added.
- On the right, you can also display the XML code that is automatically being generated in real time.
Toolbar
- General
By default, the "Save", "Copy", "Cut", "Paste" "Undo", "Redo" and "Search/Replace"
buttons are displayed. - Formatting
Buttons for formatting (e.g. bold, underline, subscript) your selected content. - Insert elements
Allows to insert for example chapters, tables, formulas, links, lists, footnotes, comments or images. - Table
In the drop-down menu you can find commands for editing (delete rows, join, etc.) tables. - Review
In the drop-down menu you can find commands to enable change tracking and settings to display comments and tags.
Footbar
- XML path
Displays the path to the selected XML element. The drop-down menu at the corresponding path elements can be used to execute actions such as "Insert element" or "Delete". - Notifications
The bell icon can be used to display notifications about a faulty XML structure, for example. - Zoom
You can zoom in and out the displayed content within the workspace.
Note:
- You can also use the context menu of the right mouse button to make edits in your documents.
- The available XML elements are determined by the XML Schema of the style sheet used. Also, the available actions in the tool and footbar, as well as the workspaces, may differ depending on the XML schema.
When you create a new document, you start with a topic element that represents the document. You can subordinate other topic elements to this topic element to represent the chapters of the document. A topic element generally contains a title element, a body element (which in turn contains the paragraph elements), and possibly other topic elements as subchapters. In general, with the schema configured, no deep technical knowledge is required to create structured XML content. Editing Xeditor documents is strongly oriented towards the familiar operation of classic word processing programs.
Images
With Xeditor you can search your DAM for images and insert them in the document.
To insert an image, proceed as follows:
- Position the cursor at the desired place in the document.
- Click the "Image" button in the toolbar.
- Select an image from the drop-down list or click the Select Image button to choose an image from your asset shelf.
- Click the "Insert" button.
A preview of the image is displayed at the cursor position.
Metadata
In the properties of Xeditor documents you will find their object class specific metadata fields in the Xeditor Document tab. While the "XML Schema" has already been defined when creating the document, here you have the possibility to define the "Document Language".
Note: In the "Content" tab you have the possibility to download the automatically generated xml structure.
Import XML Documents
Manuel Import
To import existing XML documents from your local file system into the system to be able to edit them with the Xeditor, proceed as follows:
- Create an (empty) Xeditor document as described in chapter "Create Xeditor Documents".
- Click the "Properties" command in the context menu of your (empty) Xeditor document.
- Navigate to the "Content" tab and select the "Select file" action there.
- Browse your file system for the desired XML document and confirm with "Next".
Note: To successfully import an existing XML document, its XML schema must match that of the Xeditor. Otherwise you will get displayed an error message when you open the Xeditor document.
Automated Import
Another option for importing XML documents is available to you via inbox folders. This is a folder that monitors the data stored there and processes it automatically according to defined rules. To use an inbox folder to import XML files, proceed as follows:
- Create an inbox folder within an asset file via the menu under "Add entry" and "New".
- Select the "Inbox folder" object class in the following "What do you want to create?" dialog.
- Navigate to the newly created inbox folder by clicking on it in the list.
- Select the "Manage rules" action in the action menu
- Create a new rule in the list of rules using the "Add entry" / "New" action.
- In the following dialog, you can name the rule and define optional conditions. Click on "Add entry" / "New" in the list of actions.
- Select the action type "Zip XML Import (asynchronous)".
- In the following dialog, you can define a list of available Xeditor schemas to which the XML documents to be imported are to be assigned.
- The "Remove DTD reference" entry can be used to automatically remove a reference from the XML documents that could cause problems during subsequent processing in the cloud.
- An "Xpath expression" in the dialog can be used to select certain sub-elements in the XML that are to serve as root elements of new Xeditor documents.
- The option "XML schema for split Xeditor documents" allows you to assign the sub-elements selected via the Xpath expression to a defined Xeditor schema.
- Click on "Next" to complete the configuration of the input folder.
Notes:
- An input folder configured in this way expects a zip file containing an XML document at the top level. Optionally, there can be an "images" folder containing images referenced in the XML.
- After successful processing, image assets and Xeditor documents are created in the inbox folder, which can be processed using further inbox folder rules.
XML Export
In addition to the standard action to export asset content via the "Download" action, a further action is available for Xeditor documents. On asset shelves and folders in Digital Asset Management, it is possible to export XML data in a structured way. To do this, proceed as follows:
- In Digital Asset Management, navigate to the asset shelf or the folder whose Xeditor documents you want to export.
- Export the documents and all referenced images by right-clicking on the folder and selecting the "Structured export" action.
- A download of a zip file starts automatically with the desired result.
- Note: In the zip file, there is a folder for each XML document and each referenced image with the name of the unique cloud ID. The folder contains the following content:
- A content.xml, which corresponds to the XML content of the Xeditor document.
- A metadata.xml, which contains some metadata of the exported asset
- Further subfolders with referenced content
Text modules in the Xeditor
The Xeditor offers the option of centrally defining predefined, reusable XML content as text modules and inserting them into any number of Xeditor documents. In this way, for example, disclaimers, warnings, legal notices or similar content can be maintained centrally and easily reused.
7.7.1 Creating text modules
Proceed as follows to define text modules:
- Make sure that you have access rights to the "Templates and Presettings" application.
- Navigate to an existing template collection and then to the "Text modules" widget.
- Create a new text module using the "Create Text Module" action.
- In the following dialog, select "Static Text Module (Xeditor)" as the object class that you want to create.
- A text module is a fully-fledged Xeditor document, which is why you must select a valid Xeditor schema in the next dialog in addition to the name, the optional category and the language.
- Click on continue to create the new text module and edit its content in the Xeditor by clicking on "Edit".
- Finally, release the text module for users via the "Release for Usage" action.
Using text modules
The insertion of text modules can be activated for Xeditor documents and then offers the option of inserting defined sub-XML structures from the list of text modules. Xeditor ensures that the XML structures are permitted at the selected position and updates them each time the document is opened.
To insert a text module into a document, proceed as follows:
- Open an Xeditor document via the "Edit" action.
- Move the cursor in the Xeditor to the position where the text module is to be inserted. Click on the "Insert variable" button in the Xeditor toolbar.
- In the following dialog, you can select a text module from the list of available text modules that are valid at this point and have it displayed in a preview.
- Click on "Next" to insert the text module into the document.
Note: Text modules are displayed differently to regular content in the document. You can recognize them mainly by the information when they were last updated, which can be found on the frame of the inserted element.