

Working with Lists
Teamrooms and folders show the contained objects in the content area as a list. Three different list views are provided.
For more information on keyboard operation, see chapter “Content Area”.
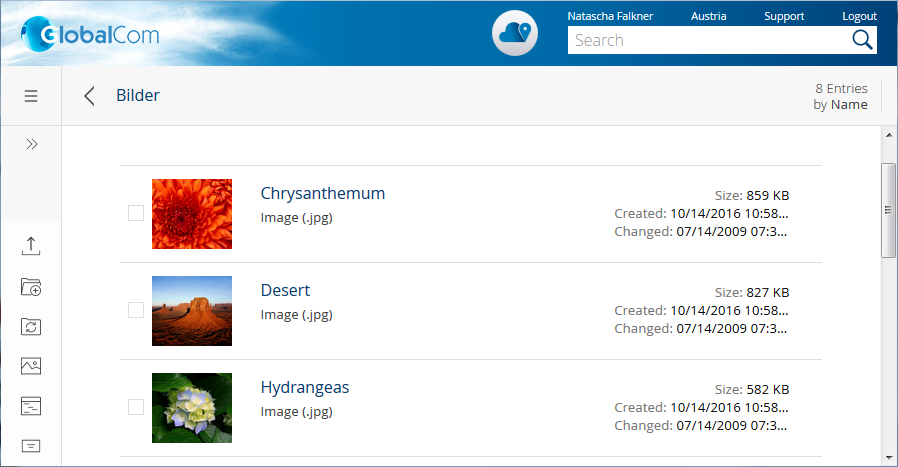
Content View
The content view is displayed per default. In this list, the most important information for the objects is shown.
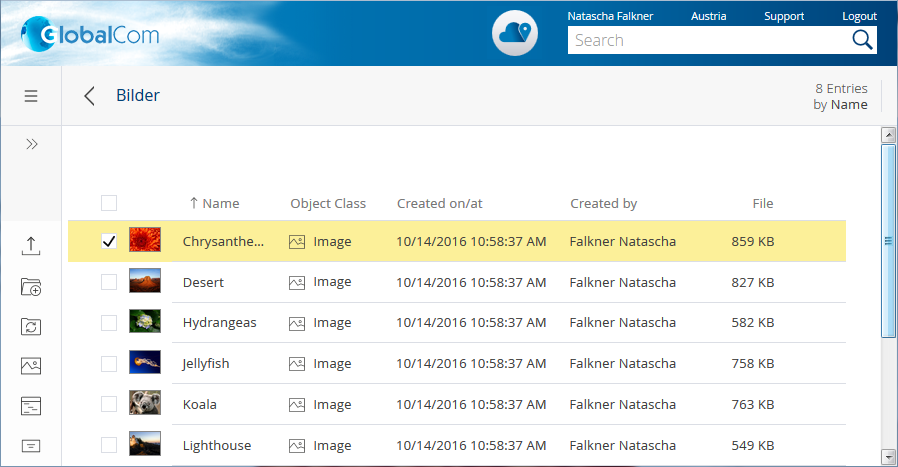
Detail View
In the detail view, you can modify the column settings to get more information about the listed objects.
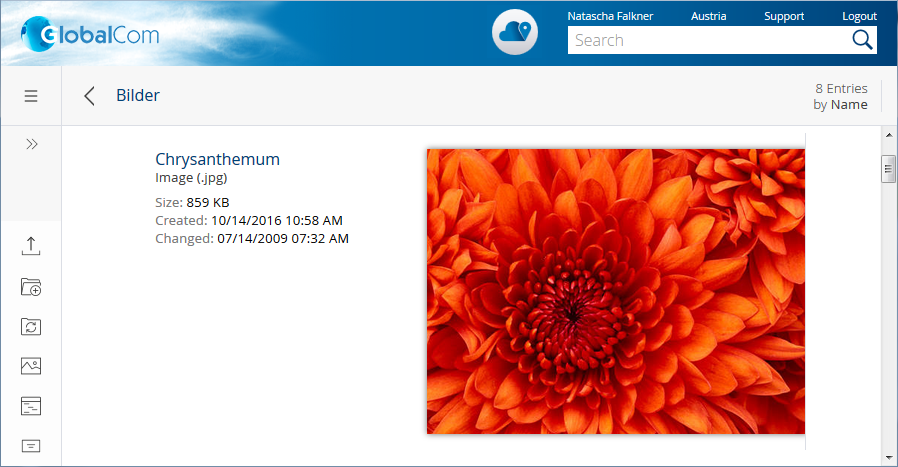
Preview
In the preview, you can find the most important meta data and the preview of the object. For documents, the first pages are displayed.
Selecting Entries
Several objects in a list can be selected to edit them concurrently.
Select several objects
To select several objects in a list, click the objects while keeping the Ctrl key pressed or mark them via the “Selection” box.
- In the content view, the “Selection” box is displayed when you hover with the mouse over the right side of the line. In the preview you have to hover over with the mouse over the left side of the line.
- In the detail view, the “Selection” box is displayed left to the first column.
- In the card view, the “Selection” box is shown below the cards.
Select an area
To select an area of an object list, select the first entry and press the Shift key. Keep the Shift key pressed and select the last entry of the area you want to select. Doing so, all objects between the two entries are selected.
Select all entries
Select the box in the column header to select all entries (only detail view).
Change the View
To switch between the views, open the context menu of the content area.
- Open the context menu of an empty part of the content area and click “Change View”.
- Select the desired view.
Display Settings
With the menu bar displayed, you can make appropriate view adjustments via the menu “View” > “Display Settings”.
Load
Allows you to load a saved display setting or the product setting.
Reset
Restores the default display settings (only visible if the current settings differ from the default settings).
Save
The current display setting (view, columns) is saved.
Following storage options are available:
- Set Default View for “<object>” for All Users
The defined view is displayed by default for all users. This option is only available if you have at least change access. - Create New Display Setting
- Save as
The display settings can be saved at various levels (personal presettings, room, configuration, collection for templates and presettings). The available levels depend on the context and your permissions. - Name
Assign a name to the new display setting. - Define as Default for Objects of This Type
Defines whether this display setting is applied to new objects of this type and to existing objects whose display settings have not been changed. The display setting actually used is also determined by the evaluation hierarchy.
- Save as
- Overwrite Existing Display Setting
- Existing Display Setting
Select a display setting to overwrite. - Define as Default for Objects of This Type
Defines whether this display setting is applied to new objects of this type and to existing objects whose display settings have not been changed. The display setting actually used is also determined by the evaluation hierarchy.
- Existing Display Setting
Evaluation hierarchy for default display settings
The display settings defined as default are determined based on the following evaluation hierarchy:
- Default View for “<object>” for All Users
- Personal Presettings
Personal display settings are available only to yourself.
Note: All saved personal display settings can be found under “account menu (your user name)” > “Advanced Settings” > “Presettings”. - Room
Display settings can be saved in the current Teamroom or shelf. - Configuration
If the room is based on a configuration, the display settings can be saved in the configuration. - Presetting Collection
Display settings can also be saved in a collection for templates and presettings to which you have access.
Change
Allows you to define and position the displayed columns via a selection dialog. Alternatively, columns can also be added, removed and moved using the header bar.
Copy
Copies the current display setting to the clipboard.
Paste
Applies the display setting in the clipboard to the current list.
Sorting, Grouping and Filtering Objects in a List
The sorting of objects in a list can be easily adapted. You can sort objects depending on various criteria in an ascending or descending order. It is also possible to sort objects depending on several criteria at the same time.
You can define the sorting by clicking the “Sort” button in the upper right corner. Alternatively, you can use the context menu of the content area.
In the detail view, you can also sort the entries via the column header. The detail view provides additionally the possibility to group a column, to fix a column or to filter the entries depending on a search criterion. For object, date and enumeration properties, a values filter is available in addition to the text filter. When using the text filter, all rows containing the entered string are displayed (case-insensitive). When using the values filter, all rows that correspond to the selected values are displayed.
Note:
- In search-based lists and in the search portal, you can also sort by specific, correspondingly indexed properties. The sortable properties can be found in the menu of the “Sort” button in the upper right corner (e.g. Name or Created on/at). In the column header, the “Sort” context menu command is only available for sortable columns. Clicking on the column header also only changes the sorting for sortable columns, otherwise nothing happens.
- To display scrollbars for fixed columns under Apple macOS, the option “System Settings” > “Appearance” > “Show scrollbars” > “Always” must be selected. Scrolling with the “Left” and “Right” arrow keys works independently of the system setting.
- Keyboard operation: The shortcut Alt + F9 takes you to the column header if the details are displayed, otherwise to the “Sort” button.
- The values filter is only offered if no element of the property path is defined as "multiple".
- The values filter for date values now has a tree structure and is therefore easier to use with keyboard and screen reader. The tree elements can be expanded or collapsed using the keyboard or by clicking on the corresponding symbol. Expanding and collapsing does not change the filter behavior and only serves to make operation easier. If subordinate tree elements have only been partially selected (for example, only one day of several in a month), then the superordinate tree elements have the status "partially selected". Clicking on a partially selected element selects all subordinate elements.
- Objects in unsorted lists can be moved not only by drag-and-drop but also with the context menu commands “Move” > “Prepare for Moving” and "Move" > "Move Before" or "Move After". Thus, the move functionality can also be used via keyboard operation.
Modify Column Settings
The columns of the detail view can be adjusted depending on your needs.
- To add a column, proceed as follows:
- Select the object in the list that provides the property you want to add.
- Open the context menu of a column in the column header.
- Click “Add Column”.
- Select the desired property.
Note:
- Which properties are available as columns depends on the type of the object that is selected in the list.
- For columns that contain objects, properties of these objects can be displayed via the “Next Level” context menu command.
- For compound properties, the properties of the compound property can be displayed via the “Details” context menu command.
- To move a column to the right or left, use the “Move to” context menu command. You can also move columns with drag and drop.
- To optimize the width of the column according to the length of the content, double-click in the column header between two columns.
- To remove a column, use the “Remove” context menu command.
- Keyboard operation: The shortcut Alt + F9 takes you to the column header.
Column Editing in the Details View
If you mark a cell and press the F2 key, you can directly edit the content of the cell.
For efficient editing of several objects at the same time possibilities similar to a spreadsheet program are provided in the detail view.
Editing possibilities:
- copy (Ctrl + C)
- cut (Ctrl + X)
- paste (Ctrl + V)
- delete (Del key)
Several even not adjacent cells within a column can be copied and pasted at the same time. If the number of selected cells when pasting is greater than the number of selected cells when copying, then it is started over with the first value. If fewer cells are selected when pasting, only values in the selected cells are changed.
Note: Under Linux, no empty object pointers are copied.
The values can also be copied from the Fabasoft Cloud and pasted e.g. in Microsoft Excel. Pasting values from third-party products in the Fabasoft Cloud is only conditionally possible (depending on the clipboard format of the third-party product).
Table Handling
The alternatively available table editing can be activated by pressing the “Table Handling” button (Alt + F2) in the column header. This makes the operation similar to a spreadsheet program:
- The cells are displayed with border lines.
- The hover highlighting is displayed per cell.
- Cells that cannot be edited are displayed with a gray background.
- Editing a cell is activated with F2, a double-click (fast and slow) or typing letters/numbers.
- A click on the object name does not open the object.
Calculations Within Object Lists
For numerical and currency values displayed in a column, the number (of entries with a value), the total and the average can be calculated. The “Calculate” command is available in the context menu of the column header for the corresponding column. The result is displayed at the bottom of the page.
If the list is grouped, the calculations are performed per group and displayed at the end of the group entries. For filtered object lists, only the entries displayed are used for the calculation.
If a value is changed, for example, with the F2 key a recalculation only takes place after the list has been updated. The values of the old calculation are grayed out.
Copy Data Table
If you enable the menu bar, you can use the “Clipboard” > “Data Table” > “Copy” menu command to copy the list in the clipboard and paste it for example in Microsoft Excel. If some lines are selected, only those lines will be copied to the clipboard. The order in which the lines were selected is taken into account.
Note: If you choose "Copy Extended", additionally to the visible columns also entries of shown object lists and all values of aggregates and aggregate lists are copied as nested table.
Infobox
The infobox is displayed after about one second, if your mouse is placed over the check box or symbol of a selected object and not moved. This way you get the most important information without the need to open the object.
Note: You can disable the infobox in the “Base Settings” with the Show Hints option.
Lists in the Property Editor
To reduce the complexity of the property editor and improve the overview, a simplified view is available for object and aggregate lists. The “Show details” button takes you to a full view of the list optimized for editing.
Simplified List
The reduced editing options in the simplified list provide an improved overview.
- No menu bar is displayed.
- The number of entries displayed depends on the context. In general, a maximum of 15 entries are displayed. The “Further Entries” button takes you to the full view.
- Sorting and grouping cannot be carried out in the simplified list. These are taken over by the settings in the full view.
- Only as many columns as space is available are displayed. Thus, horizontal scroll bars can be avoided.
- Thumbnails are not displayed in the detail view.
- Actions on the entries can be carried out via the context menu.
- Actions concerning the list can be offered via buttons above the list.
- Direct editing with F2 is possible depending on the list.
- If there are more entries that can be displayed on a page, the column headings are fixed.
Full List
The full list is used in particular for editing and can be accessed via the “Show Details” button of the simplified list. If the list is the only field on a tab, the full list can also be displayed directly.
- The full view makes optimum use of the window width.
- The full list offers the complete list functionality as usual.
- If there are more entries that can be displayed on a page, the column headings are fixed.