

Apple macOS
In order to select the correct package depending on the processor, check the chip of the macOS device you are using:
- At the top left, open the Apple menu.
- Click "About This Mac".
- In the appearing window, look for "Processor" or "Chip".
- Check if it says "Intel" or "Apple".
Installing
To install the Fabasoft Cloud Client, perform the following steps:
- Download the installation package that fits the chip type of the device from the Fabasoft Cloud.
Apple Chip
https://at.cloud.fabasoft.com/folio/fscasp/content/lib/CloudClient-Apple.dmg
Intel Chip
https://at.cloud.fabasoft.com/folio/fscasp/content/lib/CloudClient-Intel.dmg - Double-click the downloaded DMG file.
- Drag the app to the “Applications” folder.
Note: In case of an update keep in mind to close the Fabasoft Cloud Client (menu bar > Cloud symbol > Quit) before dragging the new app to the “Applications” folder and replacing the old one. - Open the “Applications” folder and run the Fabasoft Cloud Client.
- Enter the credentials of an administrative user to finish the installation.
Note: For users without administrative rights, the administrator can finish the installation by executing the following command.
sudo /Applications/Fabasoft*/Contents/MacOS/Fabasoft*UI* -runsetup:1 - For optimum configuration, the authorizations required by the client should also be set. These are initially configured when the Fabasoft Cloud Client is started for the first time if you confirm this in the dialogs (e.g. activating the web browser extension in Safari "Safari -> "Settings" > "Extensions").
Deployment via Mobile Device Management Profile
For preconfigured workstations, where the users do not have administrative rights, the following security settings must be configured for smooth operation.
The code requirements can be obtained by following command:
codesign --display -r - <path to application>
Identifier | Service | Access | Code Requirement |
|---|---|---|---|
com.fabasoft.foliosystraypu | Accessibility | Allow | identifier "com.fabasoft.foliosystraypu" and anchor apple generic and certificate 1[field.1.2.840.113635.100.6.2.6] /* exists */ and certificate leaf[field.1.2.840.113635.100.6.1.13] /* exists */ and certificate leaf[subject.OU] = "9FUG84LZ2G" |
System Events | Allow | ||
Screen Recording | Allow | ||
Full Disk Access | Allow | ||
Apple Events | Allow* |
- * For “Apple Events” it is necessary to define the appropriate receiver.
Receiver Process Identifiers |
|---|
com.apple.finder |
com.apple.mail |
com.apple.Safari |
com.apple.systemevents |
com.apple.systempreferences |
com.microsoft.Outlook |
com.microsoft.Word |
Uninstalling
Uninstalling the Client
To uninstall the Fabasoft Cloud Client, perform the following steps:
- Quit the Fabasoft Cloud Client.
- Open “System Preferences” > “Extensions” and disable the “Finder” entry under “Fabasoft Cloud”.
- Open “Finder” and delete the following files:
- /Applications/Fabasoft Cloud.app
- /Library/PrivilegedHelperTools/com.fabasoft.finderinjectorpu
- ~/Library/Application Support/Fabasoft
- /Library/Application Support/Adobe/CEP/extensions/com.fabasoft.cloud
- Open the following files and remove all lines containing the following:
Fabasoft Cloud, nmextmozpu@fabasoft.com, icjlkccflchmagmkfidekficomdnlcig, jdibaejnifcnoojmhgcbaohifohjamlg- /Library/Preferences/org.mozilla.firefox.plist
- /Library/Preferences/org.mozilla.thunderbird.plist
- /Library/Managed Preferences/com.google.Chrome.plist
- /Library/Managed Preferences/com.microsoft.Edge.plist
- Run the command “killall cfprefsd” and restart your browser or restart the computer.
Removing the Fabasoft Settings (Optional)
To remove the settings, perform the following steps:
- Open the Finder, point to “Go” and click “Go to folder”.
A dialog box opens. - Type “~/.fsc” and click “Go”.
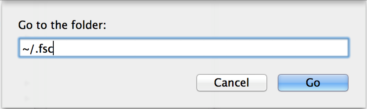
This command leads you to the folder containing the settings. - Delete the .fsc folder.
Note: When removing the .fsc folder all settings and not yet saved files will be lost.
Security Settings
The following security settings must be made after installing the Fabasoft Cloud Client.
- Access for “Accessibility Access”
The corresponding pop-up appears directly after the first start of the Fabasoft Cloud Client. - Allow Control for “Finder.app”
The corresponding pop-up appears when clicking "Open Cloud Folder" and navigating in the synchronized folder. - Allow Control for “Mail.app”
The corresponding pop-up appears when executing the use case "Send as Link". - Access for “Screen Recording”
The corresponding pop-up appears when you log in for the first time in the Fabasoft Cloud.
File and Registry Locations
The data in these locations must not be removed or modified. The configuration settings will be written during the setup process and/or when logging in with the Fabasoft Web Browser Client.
- /Applications/Fabasoft Cloud.app
- /Library/PrivilegedHelperTools/com.fabasoft.finderinjectorpu
- ~/Library/Application Support/Fabasoft
- ~/.fsc/
- /Library/Application Support/Adobe/CEP/extensions/com.fabasoft.cloud